During the past week, I concentrated on making shapes move in p5. I can tell it’s much easier to work with static elements only! Once I figure out how I can embed a javascript code snippet here I'll do it, until then you have to click on links to see the end-result.
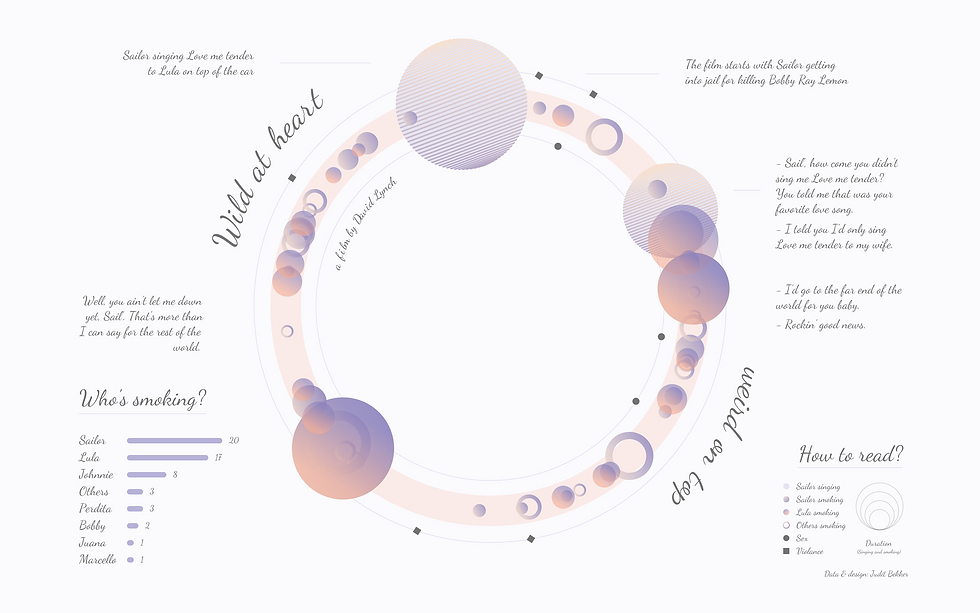
Project 1: Wild at Heart
I guess I didn’t choose the easiest exercise to start with. After I recreated my Wild at Heart viz, I wanted to add some subtle moving elements: making some shapes breathe, rotations around their center, and changing the position of gradients. The code ended up more than 500 lines which you could check out on GitHub. Here, I’ll just highlight the most interesting parts. To see it move, hop over to the p5.js web editor.
Saving the sketch as an image
One of my favorite functions I learned is how to download the current screen as png/jpg by hitting enter – this is how I got the below image. You can further customize it by adding the frameCount to its name (like I did in the other project):
// Pressing the enter will download as png

function keyPressed() {
  if (keyCode === 13) {
    saveCanvas('wildAtHeart', 'png');
  }
} 
What should be in setup() and draw()?
To set up the image in a static way, I put most of the elements I wanted to keep frozen to the setup function and added a temporary noLoop() to the draw function so that I could at least accomplish what you see above. BIGGEST MISTAKE YOU CAN make! I had to rewrite everything. I was today years old a week ago when I found out that almost everything other than setting up the canvas should be in the draw function. When I left some of my elements in the setup function, they weren’t visible at all. The reason for that is that it’s only running once, while the draw function is a neverending loop. This means it will always draw on top of the elements I placed in the setup. When I finally understood that, came another surprise: if I remove the noLoop() from my draw function, everything will look like a mess. Literally. Texts started to have orangish strokes of 45 px, things shifted to (seemingly) random places on the canvas, and some even disappeared. That was the point I learned that push() and pop() are the most important features to get familiar with. I’ll paste the documentation here since I can’t explain it any better.
The push() function saves the current drawing style settings and transformations, while pop() restores these settings. Note that these functions are always used together. They allow you to change the style and transformation settings and later return to what you had. When a new state is started with push(), it builds on the current style and transform information. The push() and pop() functions can be embedded to provide more control.
Rotating simple shapes
The next thing I tacked is rotating the tiny rectangles. This challenge caused a lot of headaches, it took me days to figure out how not to move the whole circle around the canvas and make them stay put. The solution was right in front of my eyes the whole time: it’s the marriage of the translate function and my beloved push() / pop() combo. It’s crucial to set the rectMode to CENTER (instead of the default CORNER) because instead of the top-left corner, the x & y coordinated will be in the center of the shape. Now you have to translate the coordinates to x & y and change the original coordinates of the rectangle to 0. The only thing left is to add rotation, for which I used a fragment of frameCount – because if the speed = frameCount, it would be super quick, and I needed a slower pace.
What is frameCount?
The system variable frameCount contains the number of frames that have been displayed since the program started. Inside setup() the value is 0, after the first iteration of draw it is 1, etc.
Code to rotate the tiny rectangle in the outside circle:
// Violent scenes

  push();
  for (let r = 0; r < table.getRowCount(); r++) {
    const activity = table.getString(r, 2);
    const angle = table.getNum(r, 12);
    let x = outerCircleWidth / 2 * cos(radians(angle)) + width/2;
    let y = outerCircleWidth / 2 * sin(radians(angle)) + height/2;
    noStroke();
    fill(260, 0, 45, 100);
    if (activity === 'brutality') {
      push();
      rectMode(CENTER);
      translate(x, y);
      rotate(frameCount * 0.05);
      rect(0, 0, 9, 9);
      pop();
    }
  }
Rotating gradient colors
First of all, this was the function I wrote to display the color gradients:
// Function for fill gradient

function linearGradientFill(sX, sY, eX, eY, colorS, colorE) {
  let gradient = drawingContext.createLinearGradient(
    sX, sY, eX, eY
  );
  gradient.addColorStop(0, colorS);
  gradient.addColorStop(1, colorE);
  drawingContext.fillStyle = gradient;
}
And this is the example I applied to the Lula smoking bubbles. A tiny bit more complicated than moving the rectangle but the same method. Inside a push() and pop() duo, you have to translate the coordinates to x and y and change these original values to 0 in the ellipse function and the start-stop color coordinates. The way I forced the lines to move within a circle is almost a copy of this, so I’ll save some space here by not copying that snippet and letting you discover on GitHub if you’re interested.
for (let r = 0; r < table.getRowCount(); r++) {
    const name = table.getString(r, 1);
    const activity = table.getString(r, 2);
    const angle = table.getNum(r, 12);
    const duration = map(table.getNum(r, 6), 1, 294, mapWidthMin, mapWidthMax);
    let x = middleCircleWidth / 2 * cos(radians(angle)) + width/2;
    let y = middleCircleWidth / 2 * sin(radians(angle)) + height/2;
    noStroke();
    fill(1);
    push();
    translate(x, y);
    rotate(frameCount * 0.03);
    linearGradientFill(
      0 - (duration / 4), 0 - (duration / 4),
      0 + (duration / 4), 0 + (duration / 4),
      color(247.8, 32.11, 74.51, 60),
      color(15.62, 39.34, 95.69, 60),
    );
    if (activity === 'cigarette' && name === 'Lula') {
      ellipse(0, 0, duration, duration);
    }
    pop();
Breathing bubbles
If you open the p5.js web editor link, you can see that those tiny ellipses in the inner circle change their size between a minimum and a maximum value that I (and maybe a bunch of others) called breathing. In the below code, you can see that the minimum diameter value is 5, the maximum is 12. What happens here is that if the current diameter value is less than 12, with every iteration, 0.05 will be added to it until it reaches the maximum value. At that point, it will be decreased by the same increment (0.05) with every iteration until it reaches 5 – the minimum value. And then the whole cycle starts again. This was by far the easiest movement feature to implement, but it’s also my favorite one.
// Bubble variants
var diam = 5;
var change = 0.05;

// Sex scenes

  for (let r = 0; r < table.getRowCount(); r++) {
    const activity = table.getString(r, 2);
    const angle = table.getNum(r, 12);
    let x = innerCircleWidth / 2 * cos(radians(angle)) + width/2;
    let y = innerCircleWidth / 2 * sin(radians(angle)) + height/2;
    noStroke();
    fill(260, 0, 45, 100);
    if (activity === 'sex') {
      diam += change;
      if (diam > 12){
		change = -change;
      } else if (diam < 5){
        change = -change;
      }
      ellipse(x, y, diam, diam);
    }
  }
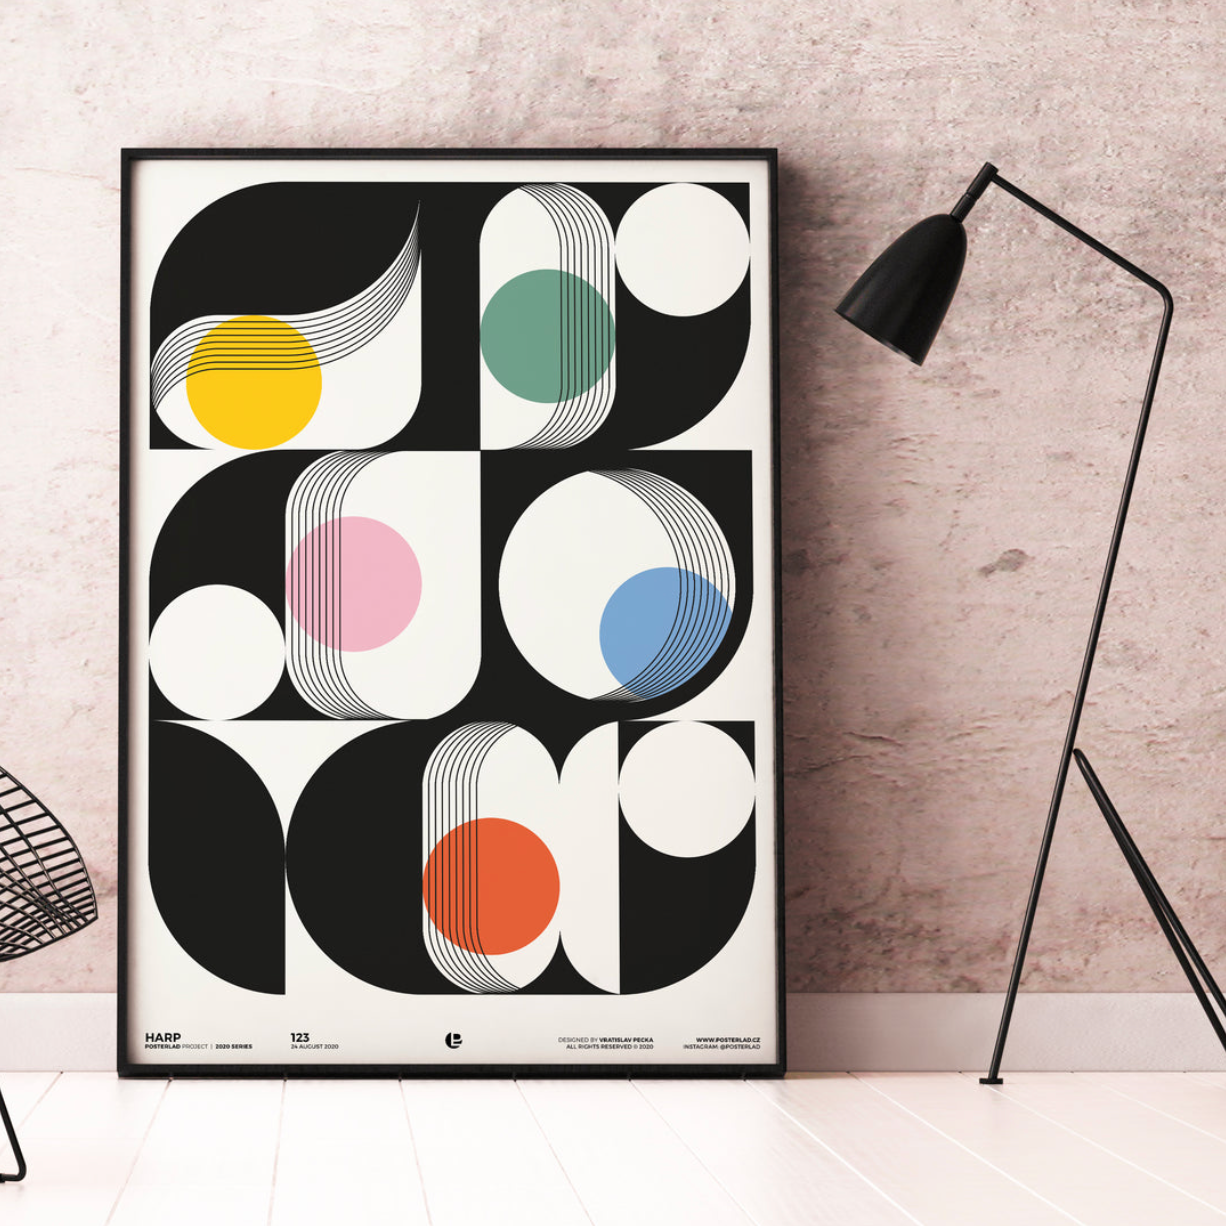
Project 2: Bouncy Bauhaus Balls
The Bauhaus Bouncy ball project was inspired by a poster on posterlad.com – see the first image below. The one to the left is what I made in p5.js and downloaded it as png (as mentioned above). You can check out the moving version on the web editor, the code is available on GitHub as well, or you can watch that poor-quality Youtube video I linked below.
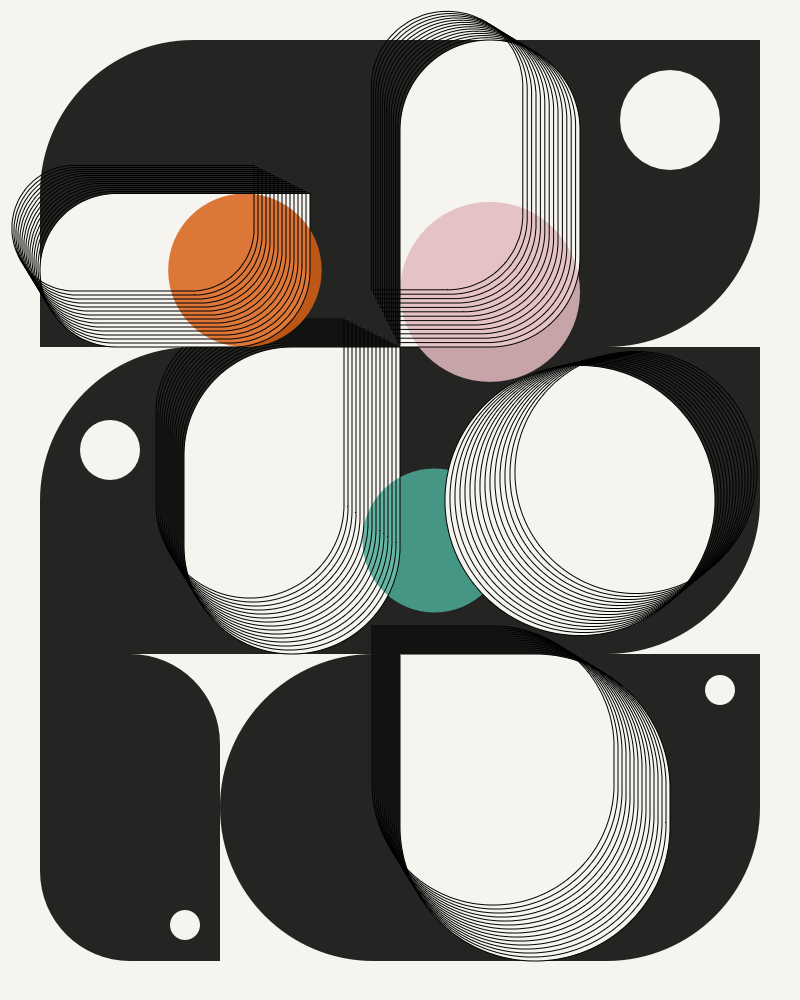
I already knew that the order of elements is important, but to achieve this hide & seek effect, I might have changed the sequence of shapes 428374628 times. This was the order I ended up with:
all black rounded rectangles
bottom white hole
bottom white hole outlines
mid left white hole
green ball
mid left white hole outlines
top left white hole
orange ball
top left white hole outlines
top right hole
pink ball
top right hole outlines
mid right white hole
mid right white hole outlines
pointless white circles
Never mind that I don’t even use white at the end, you know what I mean. 😀 I created the outlines with for loops – here’s an example for the top right hole outlines:
// Top right hole outlines
  push();
  noFill();
  stroke(360, 100, 0, 100);
  strokeWeight(1);
  for (let i = 0; i < 30; i += 2.2) {
    rect(width / 2 - i, margin - i, rectWidth / 2 - i, rectHeight - i, corner, corner, corner, 0)
  }
  pop();
To move the balls more smoothly than random, I used Perlin noise. Not sure I understand what is done in the background to achieve this effect, but I can understand how it works when I set it into motion. So I guess it’s good enough for now. Here’s the explanation of what Perlin noise is:
noise() returns the Perlin noise value at specified coordinates. Perlin noise is a random sequence generator producing a more naturally ordered, harmonic succession of numbers compared to the standard random() function. It was invented by Ken Perlin in the 1980s and been used since in graphical applications to produce procedural textures, natural motion, shapes, terrains etc.
Here ‘s an example of how I configured the orange ball to move:
let tOrange = 0;

// Orange ball
  push();
  fill(22.89, 89.4, 85.1, 85);
  ellipseMode(CORNER);
  ellipse( width * noise(tOrange + 20), margin + rectHeight / 2, rectHeight / 2, rectHeight / 2)
  tOrange += 0.01
  pop();
Tune in for more p5 project updates! I’m enjoying it way too much to stop.
Cover image credit: https://jk-lee.com/generative-design-2-0
Comments